1. Zentangle art
In my last 4 Simple Art and Craft Project for Kids post, I mentioned that Janel did some Zentangling. What is a zentangle? According to zentangle.com,A zentangle is an easy-to-learn, relaxing and fun way to create beautiful images by drawing structured patterns.
I think Janel enjoyed making this art. Take at look at some of her projects below. She even made a zentangle art of my name and her dad’s name.
 |
| Zentangle art by Janel |
Want to learn how to draw a zentangle? Watch the You Tube tutorial video below.
2. Bayanihan drawing
The second art project is also by Janel. It was an assignment in their art class. Their teacher told them to draw their own version of one of the paintings found in their book. Janel chose the Bayanihan painting.Actually, she asked why the picture was called “bayanihan.” I told her that it is a Pinoy tradition to help neighbors when they need to move house. Before, it was literally “moving house” as the men carried the house to another location. This tradition is called “bayanihan” or helping one another.
Anyway, this is her version of the “Bayanihan” painting. She used color pencil, gel pens and glitter pens. I was surprised it looked really nice.
 |
| Filipinos showing the Bayanihan spirit - drawing by Janel |
3. Nail String Art
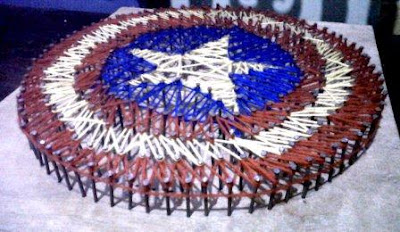
The next art project is of medium difficulty. This nail art was my eldest son’s school project and he did it together with his 3 other classmates.In a nutshell, the project requires pounding nails on a piece of wood following the pattern of an image. Choosing the image of the shield of Captain America was the easy part. The difficult part for the kids was the nailing part.
Afterward, they used yarn in 3 colors to fill up the image with zigzag and criss-cross patterns.
 |
| Captain America's shield - nail and string art project (angle view) |
 |
| Captain America's shield - nail and string art project (topc view) |
Here’s another video from You Tube — a tutorial on how to make this nail string art.
4. Recycled mosaic greeting card
My kids have made other mosaic projects before using colored paper, beans and eggshell, but I guess, they will continue making different mosaic projects as required by their teachers.This mosaic greeting card project is different because it used the wrappers of chips and biscuits. It’s a good recycling project. Here are the steps in making this project.
- Step 1: Collect wrappers of chips and biscuits. Find glossy ones as they will look more appealing.
- Step 2: Draw a design for a simple greeting card on an Oslo paper.
- Step 3: Cut the wrappers in little squares. If you prefer circles, you can use a puncher, but it was a bit difficult to punch holes because of the texture of the wrapper.
- Step 4: Glue the squares onto the design. Think about the proper color combination so that the design will be vivid.
- Step 5: Use a black pen to trace the outline of the design. (I just added this step. It was not done in this projct, but I think it would have made the design nicer).
 |
| Recycled Mosaic Greeting Card |


0 Comments